Wi-Fi controlled RC car using ESP8266-01
Here I will be documenting my Arduino project about a Wi-Fi controlled (ESP8266-01) RC car using WebSocket protocol that I’ve been working on literally for months. Actually not have been working on but instead have had in mind for months would be more appropriate to say since I didn’t really have time to completely focus on it so far and moreover with a tight budget you can’t really buy everything you need at once. Also a misplaced capacitor between the 3.3V regulator and ESP8266 took me three days to figure out why my ESP8266 was not working properly but in the meantime I’d already ordered a new NodeMCU one. *facepalm*
What are the components I’ve used for the project?
- An Arduino UNO (obviously)
- An ESP8266-01
- An L298N motor driver
- An LF33CV 3.3V regulator
- An RC car
- Also batteries that meet your needs
Wiring Diagram
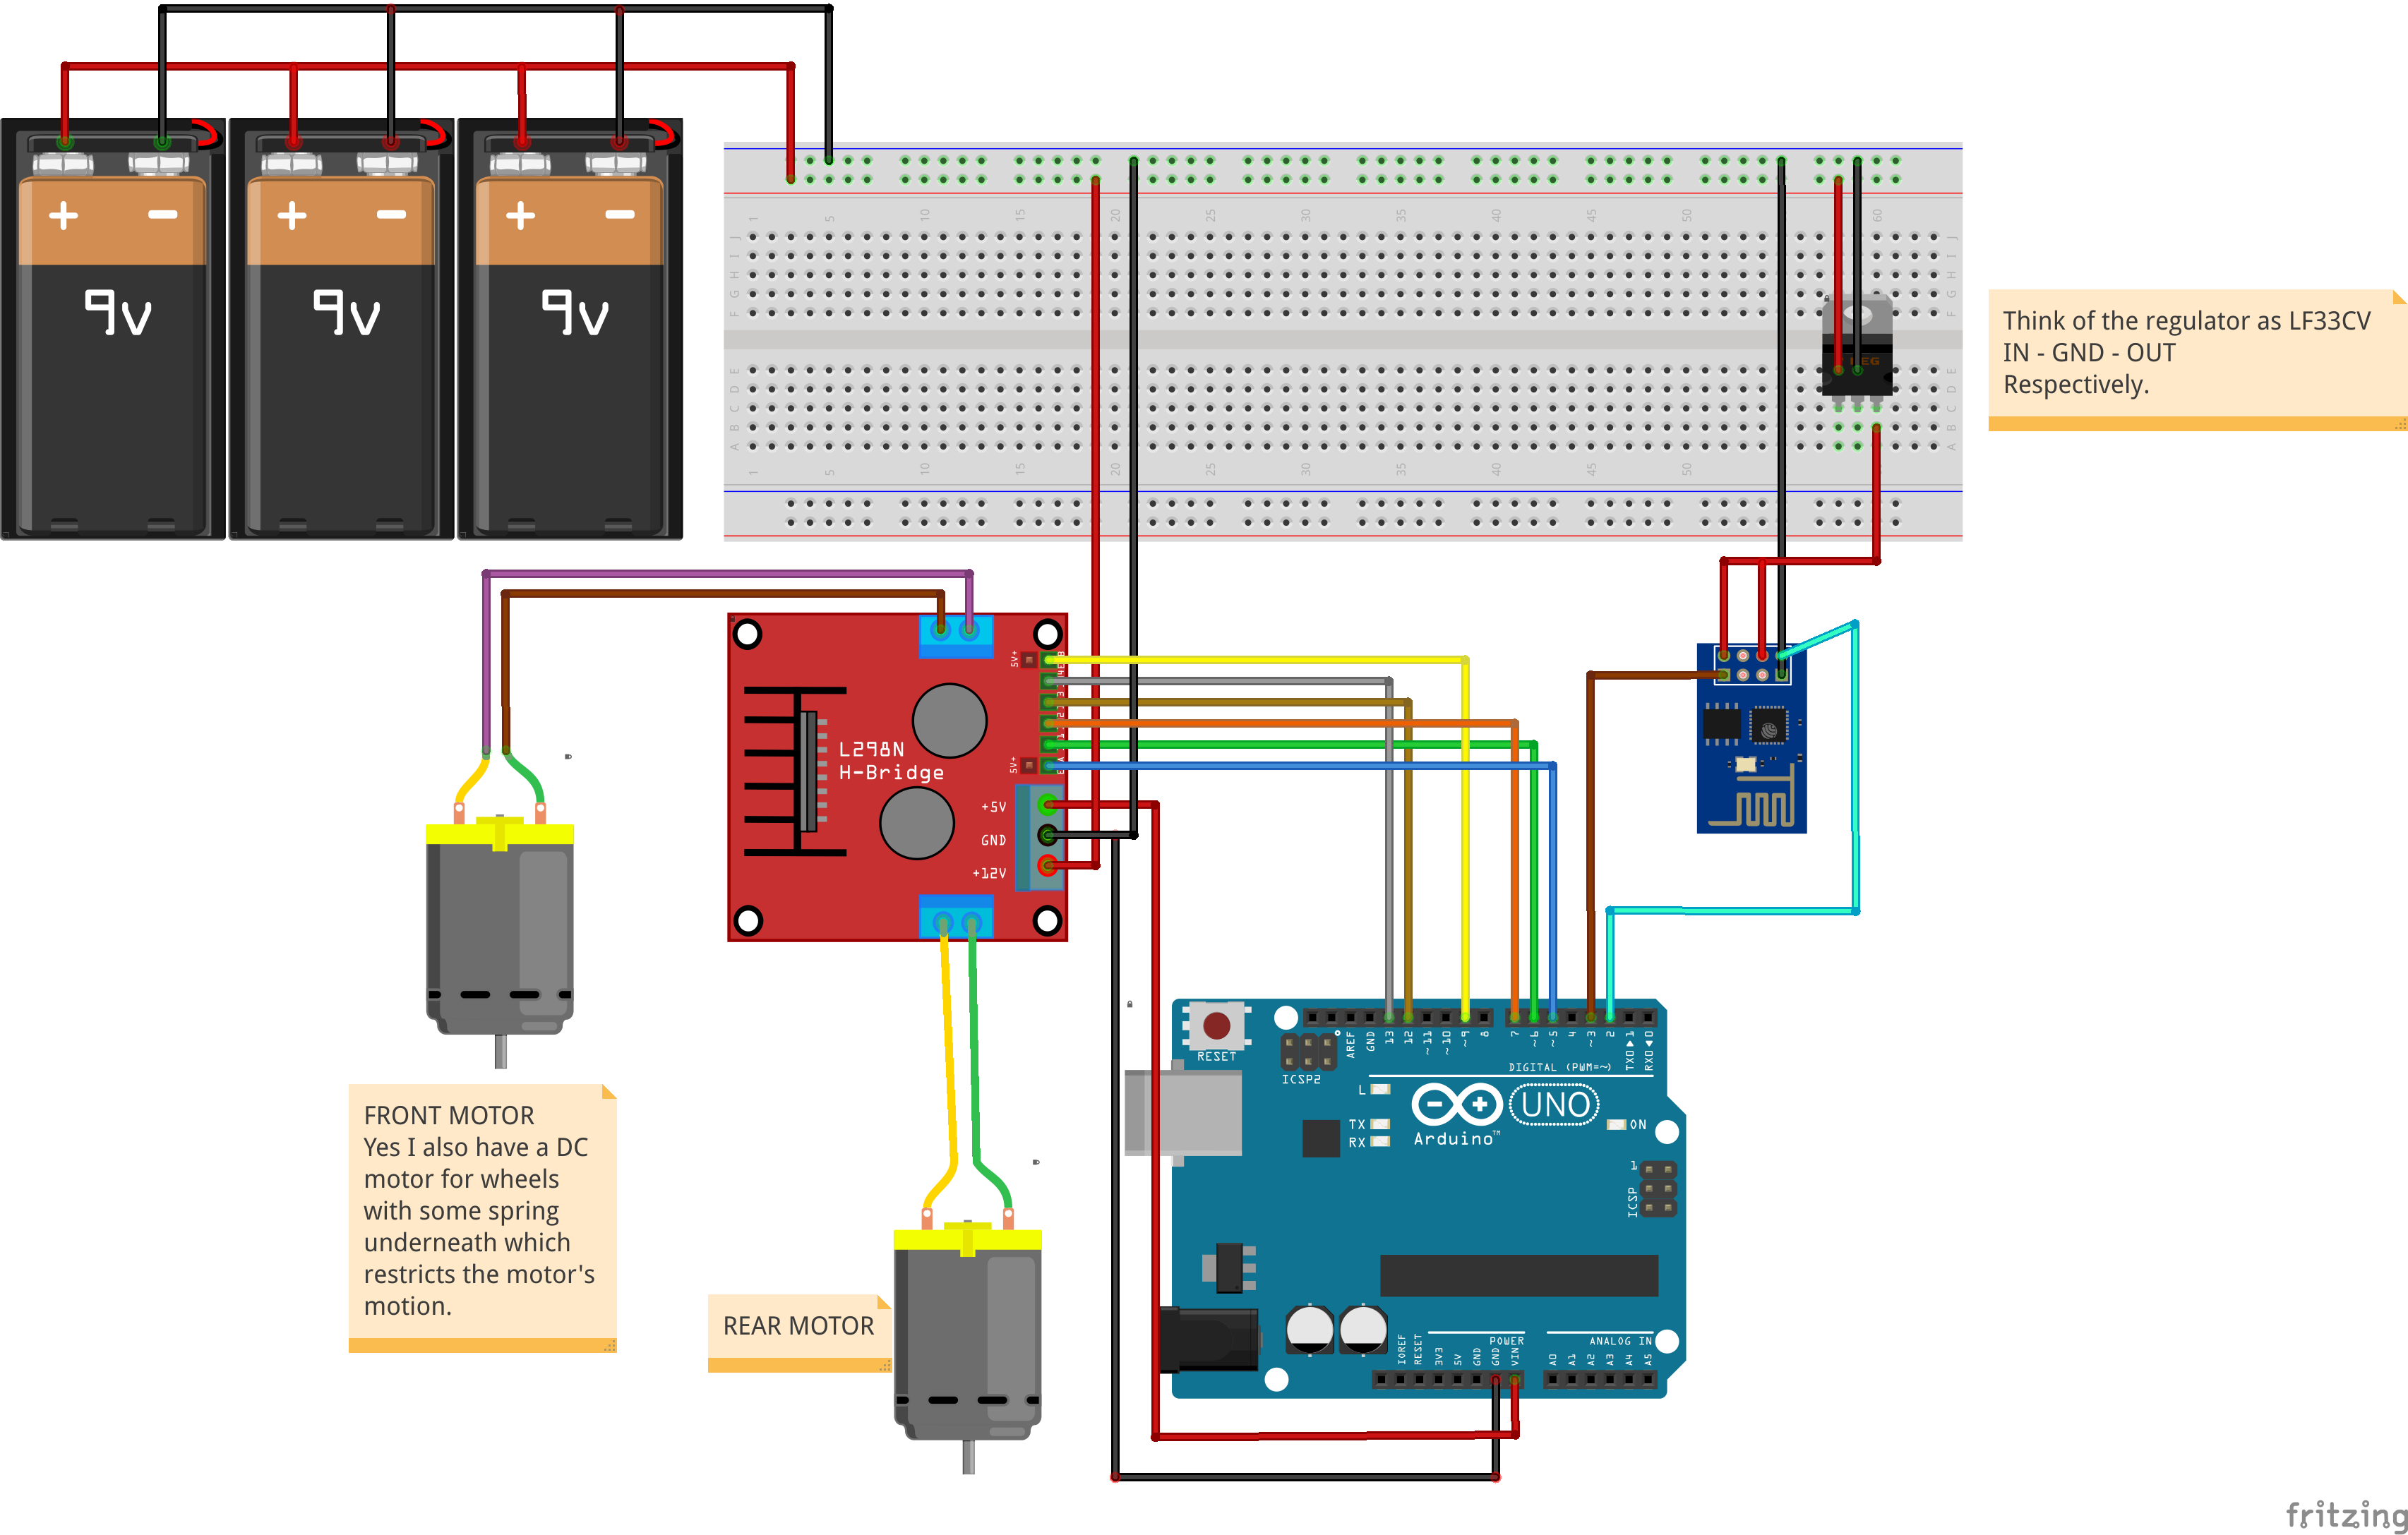
NOTE: Since I don’t have a proper battery -thanks to LiPo batteries and their even more expensive chargers-, I’ve used 3 9V batteries to source the circuit just to test it on its own but the power was not enough. I also think that it was because the front wheels are controlled by a DC motor instead of a servo motor so if you want your car to turn left, your front DC motor would always be on which will always draw current.
So that, I’ve just wired a 9V 850mA adapter as my source and had no problems driving the car around as long as its cable let me of course :).
What is WebSocket Protocol?
WebSockets are a bi-directional, full-duplex, persistent connection from a web browser to a server. Once a WebSocket connection is established the connection stays open until the client or server decides to close this connection. With this open connection, the client or server can send a message at any given time to the other.1
How is all this going to be working?
After making all the wire connections we are going to create a small website where we will be checking for keystrokes to control the RC car using our arrow keys. We will be sending those keystrokes as commands using JavaScript.
Actually I would like to control my RC car using my gamepad and adjust the car’s speed using its analogue sticks with a code written in C or C++ using the same protocol but somehow my gamepad stopped working. Therefore, until I get a new one I will be using arrow keys and a constant speed for the motor. Of course once I get the gamepad and have time for it I will also try controlling the car with the gamepad and with other protocols like HTTP or UDP to see the difference, if any.
About how I send the commands exactly, I just send a two digit number representing the motion of the car and also the direction of its wheels every time an arrow key is pressed and released. When the key is released we will be sending commands to stop whatever motion was triggered by the released key. The tens digit of the number represents the steering wheel, e.g.:
1: Left,
2: Straight,
3: Right
Ones digit of the number will be representing the movement of the car and its direction, e.g.:
1: Backwards,
2: Stop,
3: Forwards
So for example, 21 would represent “go straight backwards” in this case and 13 would represent “go left forwards”.
Creating the JavaScript File
Here I will be explaining the codes in my app.js file.
var movement = 2; // 1: BACKWARDS, 2: STOP 3: FORWARDS
var wheelDirection = 1; // 0: LEFT, 1: STRAIGHT, 2: RIGHT
Above we are declaring our variables which we will be assigning different values according to keystrokes we’ve read and then send them to our Arduino using WebSocket Protocol.
document.onkeydown = checkKeyDown; //the function which is invoked on keydown
document.onkeyup = checkKeyUp; //the function which is invoked on keyup
Defining our keydown and keyup functions.
//Creating a new connection
var connection = new WebSocket('ws://192.168.4.1:81/', ['arduino']);

connection.onerror = function (error) {
  console.log('WebSocket Error ', error);
};
connection.onmessage = function (e) {
  console.log('Server: ', e.data);
};
connection.onclose = function () {
  console.log('WebSocket connection closed');
};
We are going to connect to the server at ws://192.168.4.1 on the port 81 with a protocol named arduino.
On error, we log error to the console.
On lost connection or closed connection, WebSocket connection closed. logged to the console.
On message from the server we again log it to the console.
function checkKeyDown(e) { //When the key is pressed

    e = e || window.event;

    if (e.keyCode == '38') {
      // up arrow
      movement = 2;
      console.log("forward");
    }
    else if (e.keyCode == '40') {
        // down arrow
        movement = 0;
        console.log("down");
    }
    else if (e.keyCode == '37') {
       // left arrow
       wheelDirection = 1;
       console.log("left");
    }
    else if (e.keyCode == '39') {
       // right arrow
       wheelDirection = 3;
       console.log("right");
    }
    var sum = (wheelDirection*10)+movement;
    connection.send(sum.toString());
    console.log("sum: "+sum);
}
Here we are defining our checkKeyDown function. What we are doing is simply checking the keystrokes whether they are one of the arrow keys, if so, we are assigning the variables the above specified values accordingly.
At the end we are summing the two values wheelDirection and movement then we are sending the sum to the server and also logging it to the console.
function checkKeyUp(e) { //When the key is released

    e = e || window.event;

    if (e.keyCode == '38') {
      // up arrow
      movement = 1;
      console.log("stop forward");
    }
    else if (e.keyCode == '40') {
        // down arrow
        movement = 1;
        console.log("stop backwards");
    }
    else if (e.keyCode == '37') {
       // left arrow
       wheelDirection = 2;
       console.log("stop left");
    }
    else if (e.keyCode == '39') {
       // right arrow
       wheelDirection = 2;
       console.log("stop right");
    }
    var sum = (wheelDirection*10)+movement; //Summing the commands as mentioned.
    connection.send(sum.toString()); //Sending the number or command so to speak.
    console.log("sum: "+sum);
}
This is the same process as checkKeyDown function. The only difference is that this function sends stop signals after a key is released.
Complete JavaScript File
//app.js
document.onkeydown = checkKeyDown; //the function which is invoked on keydown
document.onkeyup = checkKeyUp; //the function which is invoked on keyup

//Creating a new connection
var connection = new WebSocket('ws://192.168.4.1:81/', ['arduino']);

connection.onerror = function (error) {
  console.log('WebSocket Error ', error);
};
connection.onmessage = function (e) {
  console.log('Server: ', e.data);
};
connection.onclose = function () {
  console.log('WebSocket connection closed');
};

var movement = 2; // 1: BACKWARDS, 2: STOP 3: FORWARDS
var wheelDirection = 1; // 0: LEFT, 1: STRAIGHT, 2: RIGHT

function checkKeyDown(e) { //When the key is pressed

    e = e || window.event;

    if (e.keyCode == '38') {
      // up arrow
      movement = 2;
      console.log("forward");
    }
    else if (e.keyCode == '40') {
        // down arrow
        movement = 0;
        console.log("down");
    }
    else if (e.keyCode == '37') {
       // left arrow
       wheelDirection = 1;
       console.log("left");
    }
    else if (e.keyCode == '39') {
       // right arrow
       wheelDirection = 3;
       console.log("right");
    }
    var sum = (wheelDirection*10)+movement;
    connection.send(sum.toString());
    console.log("sum: "+sum);
}

function checkKeyUp(e) { //When the key is released

    e = e || window.event;

    if (e.keyCode == '38') {
      // up arrow
      movement = 1;
      console.log("stop forward");
    }
    else if (e.keyCode == '40') {
        // down arrow
        movement = 1;
        console.log("stop backwards");
    }
    else if (e.keyCode == '37') {
       // left arrow
       wheelDirection = 2;
       console.log("stop left");
    }
    else if (e.keyCode == '39') {
       // right arrow
       wheelDirection = 2;
       console.log("stop right");
    }
    var sum = (wheelDirection*10)+movement; //Summing the commands as mentioned.
    connection.send(sum.toString()); //Sending the number or command so to speak.
    console.log("sum: "+sum);
}
Creating the HTML File
Creating the index.html is quite easy since we won’t need any content. Our app.js will do the work, hence we only need to include it with <script> tags.
<!--- index.html --->
<!DOCTYPE html>
<html lang="en">
<head>
  <meta charset="utf-8">
  <title>Motor Controller</title>
</head>
<body>

  <!-- Required for the application to work. -->
  <script type="text/javascript" src="app.js"></script>
</body>
</html>
Programming the Arduino UNO
Programming the Ardunio UNO we are just going to need a SoftwareSerial to communicate with the ESP8266-01. You can read the explanations in the code and that should be enough to understand. If not, you can contact me.
#include <SoftwareSerial.h>


#define BACKWARDS 0
#define STOP 1
#define FORWARDS 2
#define LEFT 1
#define STRAIGHT 2
#define RIGHT 3


SoftwareSerial esp8266(2, 3); //Rx, Tx

/*
 * info will be our int array where we will keep
 * our commands for motors separately after splitting the command
 * variable into its digits.
 * info[0] will be our wheelDirection, info[1] our movement.
 */
int info[2] = {0};

/* This will keep the command coming from the ESP8266
 * Which for example could be numbers like 20, 11, 23
 */
int command;
char c;
int i;

void setup()
{
  Serial.begin(9600);  //For Serial monitor
  esp8266.begin(9600); //ESP Baud rate
  /*
     Don't make the mistake of using
     higher baud rates than the ESP8266 or Arduino UNO can handle
     like I did. Then you may get erroneous bits, hence erroneous commands.
  */

  // Pin outs for the front motor
  pinMode(13, OUTPUT);
  pinMode(12, OUTPUT);
  pinMode(9, OUTPUT);

  // Pin outs for the rear motor
  pinMode(7, OUTPUT);
  pinMode(6, OUTPUT);
  pinMode(5, OUTPUT);

  // Front motor output pins' initialization
  analogWrite(9, 0);
  digitalWrite(12, LOW);
  digitalWrite(13, HIGH);

  // Rear motor output pins' initialization
  digitalWrite(7, HIGH);
  digitalWrite(6, LOW);
  analogWrite(5, 0);
}

/* A function to split the command into its digits
 * and set the speed and direction of motors accordingly.
 */
void setSpeed(int newSpeed) {

  int temp = newSpeed;

  /* Printing out our command to the serial monitor so that
      we can check what's going on.
  */

  Serial.print("Command: ");
  Serial.println(temp);


  /* Here we are splitting the command (the number actually)
     into its digits. So that we can power the motors according
     to those digits and their meaning in switch case block.
  */
  i = 0;
  while (temp) {
    info[i] = temp % 10;
    temp /= 10;
    i++;
  }

  // Switch case block for front wheels.
  switch (info[1]) {
    case LEFT:
      analogWrite(9, 150);
      digitalWrite(12, HIGH);
      digitalWrite(13, LOW);
      break;
    case RIGHT:
      analogWrite(9, 150);
      digitalWrite(12, LOW);
      digitalWrite(13, HIGH);
      break;
    case STRAIGHT:
      analogWrite(9, 0);
      break;
  }

  // Switch case block for rear wheels.
  switch (info[0]) {
    case BACKWARDS:
      analogWrite(5, 150);
      digitalWrite(6, HIGH);
      digitalWrite(7, LOW);
      break;
    case FORWARDS:
      analogWrite(5, 150);
      digitalWrite(6, LOW);
      digitalWrite(7, HIGH);
      break;
    case STOP:
      analogWrite(5, 0);
      break;
  }
}

void loop()
{
  /* Here we are checking the number of bytes
   *  available for reading from the serial port.
   *  Then we read that data byte by byte checking
   *  if there is a colon ":". Because we are sending commands
   *  in a way like "command: 23" so that after a colon
   *  we can try to parse  to int what's in the buffer after ":".
   *  Which will parse just 2 numbers then stop.
   *  Then we call the setSpeed function.
   *  One last thing is that:
   *  We clear the buffer until there nothing to read at the end of each loop.
   */
  if (esp8266.available() > 0) {
    c = esp8266.read();
    if (c == ':') {
      command = esp8266.parseInt();
      setSpeed(command);
      while (esp8266.read() != -1) {
        //DO NOTHING - to clear the buffer.
      }
    }
  }
}
Programming the ESP8266-01
We are going to use the arduinoWebSockets library by Links2004. Download the library from GitHub and install it. (Sketch > Include Library > Add .ZIP Library…)3
#include <ESP8266WiFi.h>
#include <WiFiClient.h>
#include <WebSocketsServer.h>

WebSocketsServer webSocket(81);

const char *ssid  = "softAPI";  // You will connect your phone to this Access Point
const char *pw    = "thereisnospoon"; // and this is the password

IPAddress ip(192, 168, 4, 1);
IPAddress netmask(255, 255, 255, 0);

void startWebSocket() { // Start a WebSocket server
  webSocket.begin(); // start the websocket server
  webSocket.onEvent(webSocketEvent); // if there's an incomming websocket message, go to function 'webSocketEvent'
  Serial.println("WebSocket server started.");
}

void webSocketEvent(uint8_t num, WStype_t type, uint8_t * payload, size_t lenght) { // When a WebSocket message is received
  switch (type) {
    case WStype_DISCONNECTED: // if the websocket is disconnected
      Serial.printf("[%u] Disconnected!\n", num);
      break;
    case WStype_CONNECTED: { // if a new websocket connection is established
        IPAddress ip = webSocket.remoteIP(num);
        if ( payload != NULL) {
          Serial.printf("[%u] Connected from %d.%d.%d.%d url: %s\n", num, ip[0], ip[1], ip[2], ip[3], payload);
        }
      }
      break;
    case WStype_TEXT: // if new text data is received,
      if (payload != NULL) {
        // I used an if statement here for the payload because when the payload was NULL, I was getting some weird errors from the ESP8266 and the device was resetting itself.
        Serial.printf("[%u] command: %s\n", num, payload);
      }
      break;
  }
}

void setup() {
  Serial.begin(9600);

  delay(1000);

  WiFi.softAPConfig(ip, ip, netmask);
  WiFi.mode(WIFI_AP);
  WiFi.softAP(ssid, pw); // configure ssid and password for softAP
  startWebSocket();
  Serial.printf("Soft AP created: %s", WiFi.softAPIP().toString().c_str());
}


void loop() {
  webSocket.loop();
}
Video
Lastly, I am leaving this video below so you can see the car in action. But as I mentioned, since I didn’t have a good battery to power it, it’s just powered with a 9V 850mA adapter which explains why it is on my desk.
References
- Introduction to WebSockets
- ESP8266 core for Arduino
- WebSocket communication by tttapa (I really recommend reading this guide to anyone who is interested in IoT or simply ESP8266)